Slack
For general information about Rollbar's alerting features, check out the Notifications guide.
Setup
Configuration is per-project in Rollbar.
- In Rollbar, navigate to the project you want to integrate with Slack
- Click Settings → Notifications → Slack
- Click Connect with Slack
- Select the Slack team you want to integrate with and authorize the permission request.
- Select the channel or group you wish to receive messages for
- Click Enable Slack Integration
- Go to the slack channel and type @Rollbar, then press enter to invite the slack bot.

- Click Add to channel to confirm.

- You are now ready to configure Slack Notifications for one of your Rollbar Projects
- Select the Projects left hand menu
- Select the Rollbar Project that you want to configure Slack Notifications for
- Choose the Notifications sub-menu
- Choose Slack as the Notification Type and click the Configure button
- Add the Slack channel (that you added @Rollbar to) to the Channel or Group text box
- Send a test notification and click Save Settings.

- To add rules, choose from the templates dropdown, then Configure.

- Add the correct channel or group, then Create Rule.

- Go back to your project and trigger an error message.
Congrats! Slack is now integrated with Rollbar. Default rules will have been created for the various events that Rollbar notifies on. You can customize the rules by editing them, deleting them, or adding new ones.
Slack Actions

Slack notifications can include optional actions to allow you to
- Assign to teammates
- Resolve, mute, or reopen
- Change level to
critical,warningetc.
Actions can be enabled/disabled for all notifications within a project as well as individual notification rules.
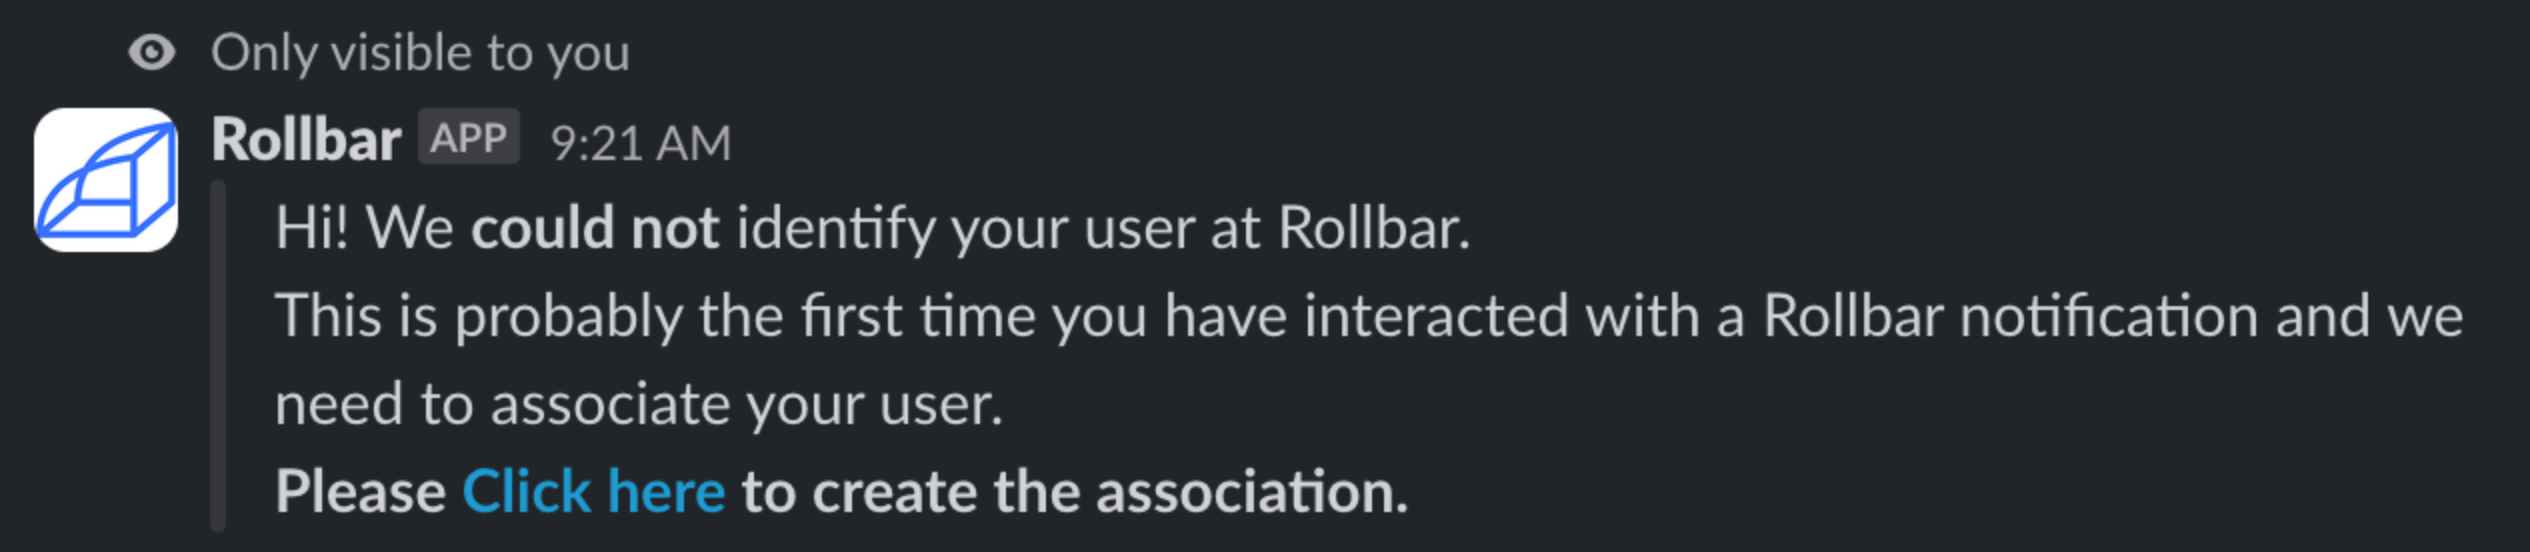
Look for a Direct Message from Rollbar
Slack Actions require your Slack user account to be tied to your Rollbar user account. The first time that you perform a Slack Action (such as resolving or assigning a Rollbar item from within Slack), Rollbar will send you a DM, with a quick link to follow to initiate the pairing.
Slack OAuth migration
If you’re still using user tokens, please migrate to the bot.
- Click on Get Started to start the migration process.

- Click on Add to slack to add it to your workspace.

- Click Allow to continue.

- Complete Migration.

- Go to slack and invite the bot with @Rollbar to the channel, then follow the steps above in the Configuration per-project in Rollbar.

Tips & Tricks
- You can configure what channel you send the notifications to on each individual rule.
- You can customize the content of Slack messages by using notification variables.
- In addition to notification variables, any data value sent in the JSON payload of an item or occurrence may be used as a variable, including custom data. Examples of usage are
{{body.request.url}}and{{body.server.host}}. If your JSON payload includes the custom values{ handler: { key: process-job, id:100 }}then you can use the variables{{body.handler.key}}and{{body.handler.id}}in your notifications. To view the full set of available values, look at the "Params" values of an occurrence in your project. All params besides the ones listed in the above notification variables must be prefaced with "body" and will be truncated to 100 characters. Note: numerical keys such as{{body.custom.0}}aren't supported. - You can mention specific Slack users in notification messages using the syntax
<@username>. - To mention
@here, or@everyone, use the syntax<!here>, or<!everyone>. - To mention a group use the syntax
<!subteam^{your_slack_group_id}>. - To mention a channel use the syntax
<#{your_slack_channel_id}> - To add a newline to the slack message, simply type it into the template, e.g.
[{{project_slug}}] - {{body.framework}} - {{level}} - {{trigger_description}}
{{title}}
{{link}}
If you would like to include the context value in a Slack notification, the example would look like this:
<{{link}}|#{{counter}} {{occurrence_title}} {{body.context}}>
Troubleshooting
If your Slack integration automatically disables or stops working, this is usually due to an error occurring after attempting to send a notification to Slack from Rollbar.
Some reasons this can happen include:
- Slack channel no longer exists
- Slack channel is archived
- Access token was disabled
- User who set up Slack integration no longer has access
- You have not migrated to the new OAuth access. See Slack OAuth migration
Most of the time you can fix the integration by simply adjusting the notification rules, such as the channel names.
Removing Slack integration
You can always disable Slack notification rules. To remove Slack integration completely, please contact support at [email protected].